As you've probably guessed by the title of my article, I still consider Ruby on Rails as a relevant technology that offers a lot of value, especially when combined with ReactJS as it's frontend counterpart. Here's how I approach the topic.
Have you ever created a single page application using a front-end framework and using Ruby on Rails on a back-end without using Rails views? If you haven’t but you want to do – here’s the tutorial for you! In this article I’ll explain how to connect AngularJS with Ruby on Rails using UI-Router and Angular-Templates.
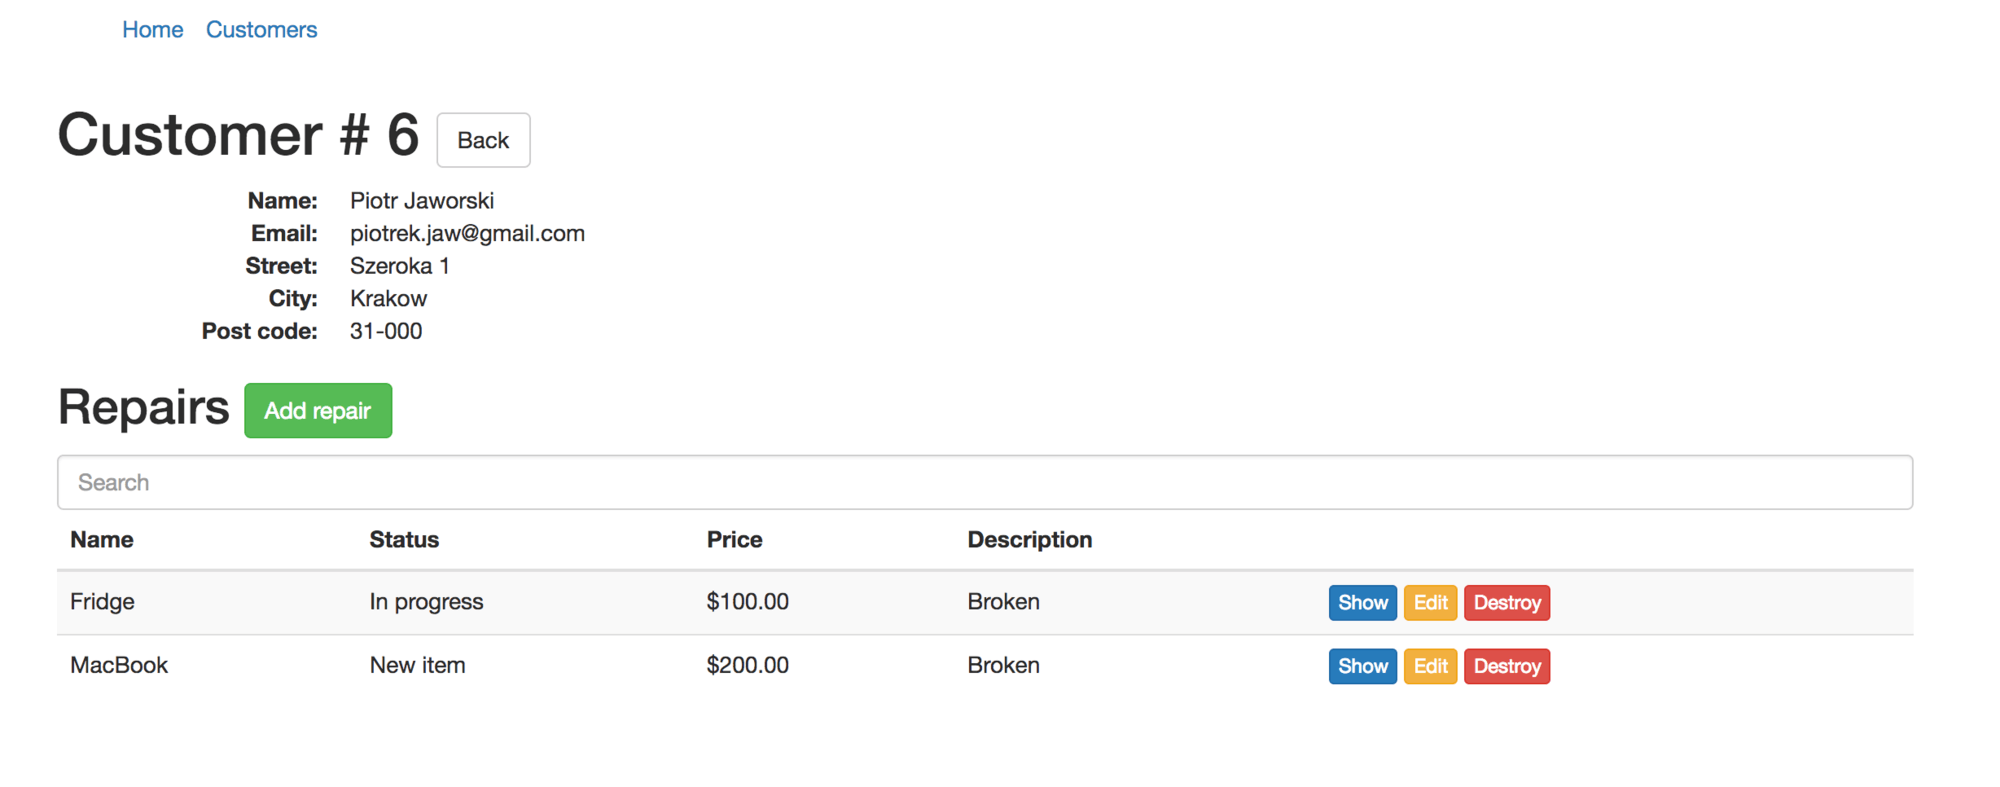
What will we build? AngularJS Single Page App which will allow the user to add a customer, search for them and add to each service-repairs. Like a computers/electronics service application!
It will look like:

Customer detail:
You need basic Ruby on Rails and AngularJS knowledge to do it, because I won’t be describing how Rails controllers work or what AngularJS directive is.
I’ll be using Rails 5.0.1 and AngularJS 1.6.1. You don’t need to install AngularJS via npm but you need to install bundler and Rails.
AngularJS Single Page App Setup
Ok, let’s start by creating an application:
$ rails new angular_single_page_app
Let’s do small cleanup in Gemfile – leave only needed gems and add ‘angular-rails-templates’.
source 'https://rubygems.org'

git_source(:github) do |repo_name|
  repo_name = "#{repo_name}/#{repo_name}" unless repo_name.include?("/")
  "https://github.com/#{repo_name}.git"
end

gem 'rails', '~> 5.0.1'
gem 'sqlite3'
gem 'puma', '~> 3.0'
gem 'sass-rails', '~> 5.0'
gem 'uglifier', '>= 1.3.0'
gem 'jbuilder', '~> 2.5'

gem 'angular-rails-templates'

group :development, :test do
  gem 'pry-rails'
end

group :development do
  gem 'listen', '~> 3.0.5'
  gem 'spring'
  gem 'spring-watcher-listen', '~> 2.0.0'
end
Then run bundler to install everything on your machine:
$ bundle install
Now let’s download needed libraries – AngularJS and UI-Router. Just copy the content of the following links and add these files as angular.js and angular-router.js to vendor/assets/javascripts:
https://code.angularjs.org/1.6.1/angular.js
https://unpkg.com/[email protected]/release/angular-ui-router.js
Remember to include them in application.js:
//= require angular
//= require angular-router
//= require angular-rails-templates
//= require cable
//= require_tree ./angular
//= require_tree ./channels
Now we need an angular folder inside the app/assets/javascripts and inside that two additional folders which will keep our templates and controllers:
– controllers
– templates
Inside the controllers folder add the MainController.js file:
var app = angular.module('app');

app.controller('MainController', ['$scope', function($scope) {
  $scope.test = "Welcome in the customers application!";
}]);
It just includes a sample text which is passed to a scope.
Inside the templates/main folder create the file index.html, which includes only h2 tag:
<h1>{{ test }}</h1>Now we need to add angular application configuration. Let’s do it inside the app.js file inside the app/assets/javascripts/angular:
var app = angular.module('app', ['templates', 'ui.router']);

app.config(['$stateProvider', '$urlRouterProvider', '$locationProvider', function($stateProvider, $urlRouterProvider, $locationProvider) {
  $stateProvider
    .state('/', {
      url: '/',
      templateUrl: 'angular/templates/main/index.html',
      controller: 'MainController'
    });

  $urlRouterProvider.otherwise('/');
}]);
What have we added here? Application declaration and $stateProvider configuration. $stateProvider defines routes in our application. Each route has its identifier, path, templateUrl and points which controller handles it.
Now let’s add the MainController.rb file inside app/controllers. This controller will just render an empty file, needed for controllers action:
class MainController < ApplicationController
  def index
  end
end
Create an empty index.html file under the app/views/main. Like I said before – it’s needed just to handle AngularJS rendering.
Now we need to remove turbolinks and declare angular application inside html views. Also we need to initialize angular templates and ui-router (<div ui-view></div>). Update application.html.erb file inside app/views/layouts:
<!DOCTYPE html>
<html>
  <head>
    <title>AngularSinglePageApp</title>
    <%= csrf_meta_tags %>

    <%= stylesheet_link_tag    'application', media: 'all' %>
    <%= javascript_include_tag 'application' %>
  </head>

  <body ng-app="app">
    <div ui-view></div>
  </body>
</html>
Finally update routes.rb and point a root path:
Rails.application.routes.draw do
  root 'main#index'
end
Your main page (http://localhost:3000) should return:
Welcome to the customer application!
Create first scaffold – Customers
Let’s create our first scaffold – customers.
$ rails g scaffold customer name email street city post_code
Run migration to create a new table:
$ rake db:migrate
You can remove app/assets/stylesheets/scaffolds.css because it’ll override some styles, which we’ll add.
Also HTML files inside the app/views/customers are not needed so you can remove them too.
Now let’s clean unneeded methods in the CustomersController and leave only json format in all responses:
class CustomersController < ApplicationController
  before_action :set_customer, only: [:show, :edit, :update, :destroy]

  def index
    @customers = Customer.all
  end

  def show
  end

  def create
    @customer = Customer.new(customer_params)

    respond_to do |format|
      if @customer.save
        format.json { render :show, status: :created, location: @customer }
      else
        format.json { render json: @customer.errors, status: :unprocessable_entity }
      end
    end
  end

  def update
    respond_to do |format|
      if @customer.update(customer_params)
        format.json { render :show, status: :ok, location: @customer }
      else
        format.json { render json: @customer.errors, status: :unprocessable_entity }
      end
    end
  end

  def destroy
    @customer.destroy

    respond_to do |format|
      format.json { head :no_content }
    end
  end

  private

  def set_customer
    @customer = Customer.find(params[:id])
  end

  def customer_params
    params.require(:customer).permit(:name, :email, :street, :city, :post_code)
  end
end
Update routes, to point at which actions we really need:
Rails.application.routes.draw do
  resources :customers, only: [:index, :create, :update, :show, :destroy]
  root 'main#index'
end
Twitter Bootstrap
Let’s add some styles to our application – to beautify it 🙂
Add to the Gemfile:
gem 'bootstrap-sass', '~> 3.3.6'
Install added gems:
$ bundle install
Rename application.css to application.scss in order to import bootstrap and add the following lines:
@import "bootstrap-sprockets";
@import "bootstrap";
Front-end controllers
Now, to add more angular routes; update app.js:
var app = angular.module('app', ['templates', 'ui.router']);

app.config(['$stateProvider', '$urlRouterProvider', '$locationProvider', function($stateProvider, $urlRouterProvider, $locationProvider) {
  $stateProvider
    .state('/', {
      url: '/',
      templateUrl: 'angular/templates/main/index.html',
      controller: 'MainController'
    })
    .state('/customers', {
      url: '/customers',
      templateUrl: 'angular/templates/customers/index.html',
      controller: 'CustomersController',
    })
    .state('/customer', {
      url: '/customers/:customerId',
      templateUrl: 'angular/templates/customers/show.html',
      controller: 'CustomerController'
    });

  $urlRouterProvider.otherwise('/');
}]);
We’ve just added customer and customer states. One is responsible for showing all customers and the second one renders just a selected customer.
Now we need to add two new HTML files.
Create customers/index.html:
<div class="row">
  <div class="col-md-12">
    <h1>
      Customers
      <a class="btn btn-success">Add customer</a>
    </h1>

    <div ng-show="customers.length">
      <table class="table table-striped">
        <thead>
          <tr>
            <th>Name</th>
            <th>Email</th>
            <th>Street</th>
            <th>City</th>
            <th>Post code</th>
            <th></th>
          </tr>
        </thead>

        <tbody>
          <tr ng-repeat="customer in customers">
            <td>{{ customer.name }}</td>
            <td>{{ customer.email }}</td>
            <td>{{ customer.street }}</td>
            <td>{{ customer.city }}</td>
            <td>{{ customer.post_code }}</td>
            <td>
              <a class="btn btn-primary btn-xs" ui-sref="/customer({ customerId: customer.id })">Show</a>
            </td>
          </tr>
        </tbody>
      </table>
    </div>

    <div ng-hide="customers.length">
      <div class="alert alert-warning">
        <strong>Warning!</strong> There isn't any customer yet!
      </div>
    </div>
  </div>
</div>
It renders all customers only if they’re present. If not it shows an alert.
Create customers/show.html:
<div class="row">
  <div class="col-md-12">
    <h1>Customer # {{ customer.id}}</h1>

    <dl class="dl-horizontal">
      <dt>Name:</dt>
      <dd>{{ customer.name }}</dd>
      <dt>Email:</dt>
      <dd>{{ customer.email }}</dd>
      <dt>Street:</dt>
      <dd>{{ customer.street }}</dd>
      <dt>City:</dt>
      <dd>{{ customer.city }}</dd>
      <dt>Post code:</dt>
      <dd>{{ customer.post_code }}</dd>
    </dl>
  </div>
</div>
This view just renders basic info about the selected customer.
Now we need to add new controllers.
Create CustomersController.js:
var app = angular.module('app');

app.controller('CustomersController', ['$scope', 'Customer', function($scope, Customer) {
  $scope.customers = [];

  function fetchCustomers() {
    return Customer.index().then(function(response) {
      $scope.customers = response.data;
    });
  };

  fetchCustomers();
}]);
For now it simply fetches all customers from the database and assigns them to $scope.
Create CustomerController.js:
var app = angular.module('app');

app.controller('CustomerController', ['$scope', '$stateParams', '$http', 'Customer', function($scope, $stateParams, $http, Customer) {
  $scope.customer = {};

  function fetchCustomer() {
    return Customer.show($stateParams.customerId).then(function(response) {
      $scope.customer = response.data;
    })
  }

  fetchCustomer();
}]);
It does almost the same – but it gets just one, selected customer from the database.
I think that we should add a menu to our application. A simple directive might be a good idea.
Create menu.js directive under angular/directives:
angular.module('app').directive('menu', function() {
  return {
    templateUrl: 'angular/templates/directives/menu.html',
    restrict: 'E'
  }
});
It renders a template; let’s add it now. Create templates/directives/menu.html:
<ul class="list-inline">
  <li><a ui-sref="/">Home</a></li>
  <li><a ui-sref="/customers">Customers</a></li>
</ul>
Ui-sref redirects a state name which is declared via $stateProvider. How do we declare a parameter – for example if we want to pass a customer? It’s really easy:
ui-sref="/customer({ customerId: customer.id })"We have almost everything ready but we still need to add a new service – customer. Create Customer.js service under angular/services:
var app = angular.module('app');

app.service('Customer', ['$http', function($http) {
  var base_url = '/customers'

  this.index = function() {
    return $http.get(base_url + '.json');
  };

  this.show = function(customerId) {
    return $http.get(base_url + '/' +  customerId  + '.json')
  }
}]);
This service hits the back-end, fetches records and passes them to Angular.
We forgot about declaring Angular application inside an HTML file. Let’s do it inside the main file. Update content of application.html.erb body:
<body ng-app="app">
  <div class="container">
     <menu></menu>
      <div ui-view></div>
    </div>
</body>
<div ui-view></div> mounts ui-router, which is responsible for routing and rendering templates.
Now everything is ready. Let’s add a sample record to the database, to check and admire our job 🙂 We’ll use the rails console to do it.
$ rails c
$ Customer.create(name: "Piotr Jaworski", city: "Krakow", street: "Green Street 1", post_code: "31-234", email: "[email protected]")
Go to http://localhost:3000/#!/customers. Your page should look like:

When you click the “show” link, it should redirect you to the another view:
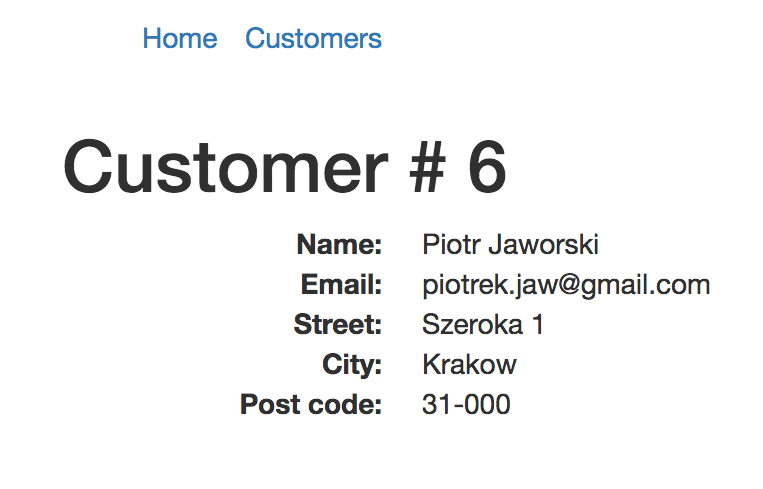
As you can see in the server log, it just renders jsons without using any html files.
Customers CRUD – AngularJS
Well, on the back-end everything is ready, but we still need to add creating/editing/deleting and searching to front-end. Let’s do it now. But first, we need to add the gem ‘angular_rails_csrf’, which will allow us to make a post/put/delete requests without adding a csrf_token hacks.
Add to Gemfile:
gem 'angular_rails_csrf'
Now install it:
$ bundle install
Next, download angular-strap library which adds a lot of cool features – modals, tooltips and a lot of things that Bootstrap offers. Add it to vendor/assets/javascripts:
https://cdnjs.cloudflare.com/ajax/libs/angular-strap/2.3.12/angular-strap.js
Remember to include it inside the application.js:
//= require angular-strap
We also need to declare it in the angular configuration – update app.js file (1st line):
var app = angular.module('app', ['templates', 'ui.router', 'mgcrea.ngStrap']);Let’s start by adding missing methods inside the Customer.js service which allows us to interact with the back-end:
var app = angular.module('app');

app.service('Customer', ['$http', function($http) {
  ...

  this.destroy = function(customerId) {
    return $http.delete(base_url + '/' + customerId + '.json')
  };

  this.create = function(customer) {
    return $http.post(base_url + '.json', {
      customer: customer
    });
  };

  this.update = function(customer) {
    return $http.put(base_url + '/' + customer.id + '.json', {
      customer: customer
    });
  };

  this.search = function(query) {
    return $http.get(base_url + '/search.json', {
      params: {
        query: query
      }
    });
  };
}]);
We’ll be using modals from angular-strap library but they need some extra configuration. Add the following styles to application.scss:
.modal-backdrop.am-fade {
  opacity: .5;
  transition: opacity .15s linear;
  &.ng-enter {
    opacity: 0;
    &.ng-enter-active {
      opacity: .5;
    }
  }
  &.ng-leave {
    opacity: .5;
    &.ng-leave-active {
      opacity: 0;
    }
  }
}
We need to add the search method in the CustomersController.rb:
def search
 @customers = Customer.search(params[:query])
end
Also declare it in the routes – update routes.rb:
resources :customers, only: [:index, :create, :update, :show, :destroy] do
 collection do
 get :search
 end
end
Create app/views/customers/search.json.jbuilder file which will return filtered records:
json.array! @customers, partial: 'customers/customer', as: :customer
Now we should declare the search method in the Customer class and add some back-end validations. Update customer.rb file:
class Customer < ApplicationRecord
  validates :name, :street, :city, :post_code, :email, presence: true
  validates_format_of :email, with: /A[^@s]+@([^@s]+.)+[^@s]+z/

  def self.search(query)
    q = "%#{query}%"
    self.where('name LIKE :query OR
                email LIKE :query OR
                street LIKE :query OR
                post_code LIKE :query OR
                city LIKE :query', query: q)
  end
end
Also update templates/customers/index.html file; add a search input, and actions which will handle adding/editing/destroying a customer:
...
    <h1>
      Customers
      <a class="btn btn-success" ng-click="addCustomer()">Add customer</a>
    </h1>

    <input type="text" placeholder="Search" class="form-control" ng-model="query" ng-change="filterCustomers()">

    <div ng-show="customers.length">
      <table class="table table-striped">
        ...
        <tbody>
          ...
          <tr>
            ...
            <td>
              <a class="btn btn-primary btn-xs" ui-sref="/customer({ customerId: customer.id })">Show</a>
              <a class="btn btn-warning btn-xs" ng-click="editCustomer(customer, $index)">Edit</a>
              <a class="btn btn-danger btn-xs" ng-click="destroyCustomer(customer.id, $index)">Destroy</a>
            </td>
          </tr>
        </tbody>
      </table>
    </div>

...
Let’s update the CustomersController.js file:
var app = angular.module('app');

app.controller('CustomersController', ['$scope', '$modal', 'Customer', function($scope, $modal, Customer) {
  $scope.customers = [];
  $scope.new_customer = {};
  $scope.customer = {};
  $scope.customerId = null;
  $scope.query = null;

  function fetchCustomers() {
    return Customer.index().then(function(response) {
      $scope.customers = response.data;
    });
  };

  $scope.addCustomer = function() {
    createModal.$promise.then(createModal.show);
  };

  $scope.createCustomer = function() {
    Customer.create($scope.new_customer).then(function(response) {
      $scope.customers.push(response.data);
      $scope.new_customer = {};
      createModal.hide();
    }, function(response) {
      alert('Something went wrong: ' + response.statusText + '. Code: ' + response.status);
    });
  };

  $scope.editCustomer = function(customer, customerId) {
    editModal.$promise.then(editModal.show);
    $scope.customer = angular.copy(customer);
    $scope.customerId = customerId;
  };

  $scope.updateCustomer = function() {
    Customer.update($scope.customer).then(function(response) {
      $scope.customers[$scope.customerId] = response.data;
      $scope.customer = {};
      $scope.customerId = null;
      editModal.hide();
    }, function(response) {
      alert('Something went wrong: ' + response.statusText + '. Code: ' + response.status);
    });
  };

  $scope.destroyCustomer = function(customerId, index) {
    Customer.destroy(customerId).then(function(response) {
      $scope.customers.splice(index, 1);
    }, function(response) {
      alert('Something went wrong: ' + response.statusText + '. Code: ' + response.status);
    });
  };

  $scope.filterCustomers = function() {
    if($scope.query != '') {
      Customer.search($scope.query).then(function(response) {
        $scope.customers = response.data;
      });
    } else {
      fetchCustomers();
    }
  };

  var createModal = $modal({
    scope: $scope,
    templateUrl: 'angular/templates/customers/addCustomerModal.html',
    show: false
  });

  var editModal = $modal({
    scope: $scope,
    templateUrl: 'angular/templates/customers/editCustomerModal.html',
    show: false
  });

  fetchCustomers();
}]);
Well, here a lot of things happen. We added $modal service. It lets us create modal objects and use them on the front-end. For example:
var createModal = $modal({
    scope: $scope,
    templateUrl: 'angular/templates/customers/addCustomerModal.html',
    show: false
  });
We pass scope and specify which template should be used. Show:false mean that it shouldn’t be visible when a template is loaded.
We also added methods that are responsible for editing/adding/filtering and deleting a customer. They are pretty simple.
After declaring two modals, we should also add their templates.
Add app/assets/javascripts/angular/templates/customers/addCustomerModal.html:
<div class="modal" tabindex="-1" role="dialog" aria-hidden="true">
<div class="modal-dialog">
<div class="modal-content">
<form novalidate name="newCustomer" ng-submit="createCustomer()">
<div class="modal-header">
<button type="button" class="close" aria-label="Close" ng-click="$hide()"><span aria-hidden="true">×</span></button>
<h2 class="modal-title">Add a customer</h2>
</div>
<div class="modal-body">
<div class="form-group">
<label>Name:</label>
<input class="form-control" name="name" type="text" ng-model="new_customer.name" required/>
<span class="text-danger" ng-show="newCustomer.name.$touched && newCustomer.name.$invalid">The name is required.</span>
</div>
<div class="form-group">
<label>E-mail:</label>
<input class="form-control" name="email" type="email" ng-model="new_customer.email" required/>
<span class="text-danger" ng-show="newCustomer.email.$touched && newCustomer.email.$invalid">The email is required.</span>
</div>
<div class="form-group">
<label>City:</label>
<input class="form-control" name="city" type="text" ng-model="new_customer.city" required/>
<span class="text-danger" ng-show="newCustomer.city.$touched && newCustomer.city.$invalid">The city is required.</span>
</div>
<div class="form-group">
<label>Street:</label>
<input class="form-control" name="street" type="text" ng-model="new_customer.street" required/>
<span class="text-danger" ng-show="newCustomer.street.$touched && newCustomer.street.$invalid">The street is required.</span>
</div>
<div class="form-group">
<label>Post code:</label>
<input class="form-control" name="post_code" type="text" ng-model="new_customer.post_code" required/>
<span class="text-danger" ng-show="newCustomer.post_code.$touched && newCustomer.post_code.$invalid">The post code is required.</span>
</div>
</div>
<div class="modal-footer">
<button type="button" class="btn btn-default" ng-click="$hide()">Close</button>
<input ng-disabled="newCustomer.$invalid" class="btn btn-success" type="submit" value="Save"/>
</div>
</form>
</div>
</div>
</div>Add app/assets/javascripts/angular/templates/customers/editCustomerModal.html:
<div class="modal" tabindex="-1" role="dialog" aria-hidden="true">
<div class="modal-dialog">
<div class="modal-content">
<form novalidate name="editCustomer" ng-submit="updateCustomer()">
<div class="modal-header">
<button type="button" class="close" aria-label="Close" ng-click="$hide()"><span aria-hidden="true">×</span></button>
<h2 class="modal-title">Edit a customer</h2>
</div>
<div class="modal-body">
<div class="form-group">
<label>Name:</label>
<input class="form-control" name="name" type="text" ng-model="customer.name" required/>
</div>
<span class="text-danger" ng-show="editCustomer.name.$touched && editCustomer.name.$invalid">The name is required.</span>
<div class="form-group">
<label>E-mail:</label>
<input class="form-control" name="email" type="email" ng-model="customer.email" required/>
<span class="text-danger" ng-show="editCustomer.email.$touched && editCustomer.email.$invalid">The email is required.</span>
</div>
<div class="form-group">
<label>City:</label>
<input class="form-control" name="city" type="text" ng-model="customer.city" required/>
<span class="text-danger" ng-show="editCustomer.city.$touched && editCustomer.city.$invalid">The city is required.</span>
</div>
<div class="form-group">
<label>Street:</label>
<input class="form-control" name="street" type="text" ng-model="customer.street" required/>
<span class="text-danger" ng-show="editCustomer.street.$touched && editCustomer.street.$invalid">The street is required.</span>
</div>
<div class="form-group">
<label>Post code:</label>
<input class="form-control" name="post_code" type="text" ng-model="customer.post_code" required/>
<span class="text-danger" ng-show="editCustomer.post_code.$touched && editCustomer.post_code.$invalid">The post code is required.</span>
</div>
</div>
<div class="modal-footer">
<button type="button" class="btn btn-default" ng-click="$hide()">Close</button>
<input ng-disabled="editCustomer.$invalid" class="btn btn-success" type="submit" value="Save"/>
</div>
</form>
</div>
</div>
</div>I should also mention that we added angular validations there.
<span class="text-danger" ng-show="newCustomer.name.$touched && newCustomer.name.$invalid">The name is required.</span>
This div will be visible when an input is touched and it’s empty or invalid. For example, if you entered an invalid email format to email type input. It’s pretty cool because it helps to check which validation fails.
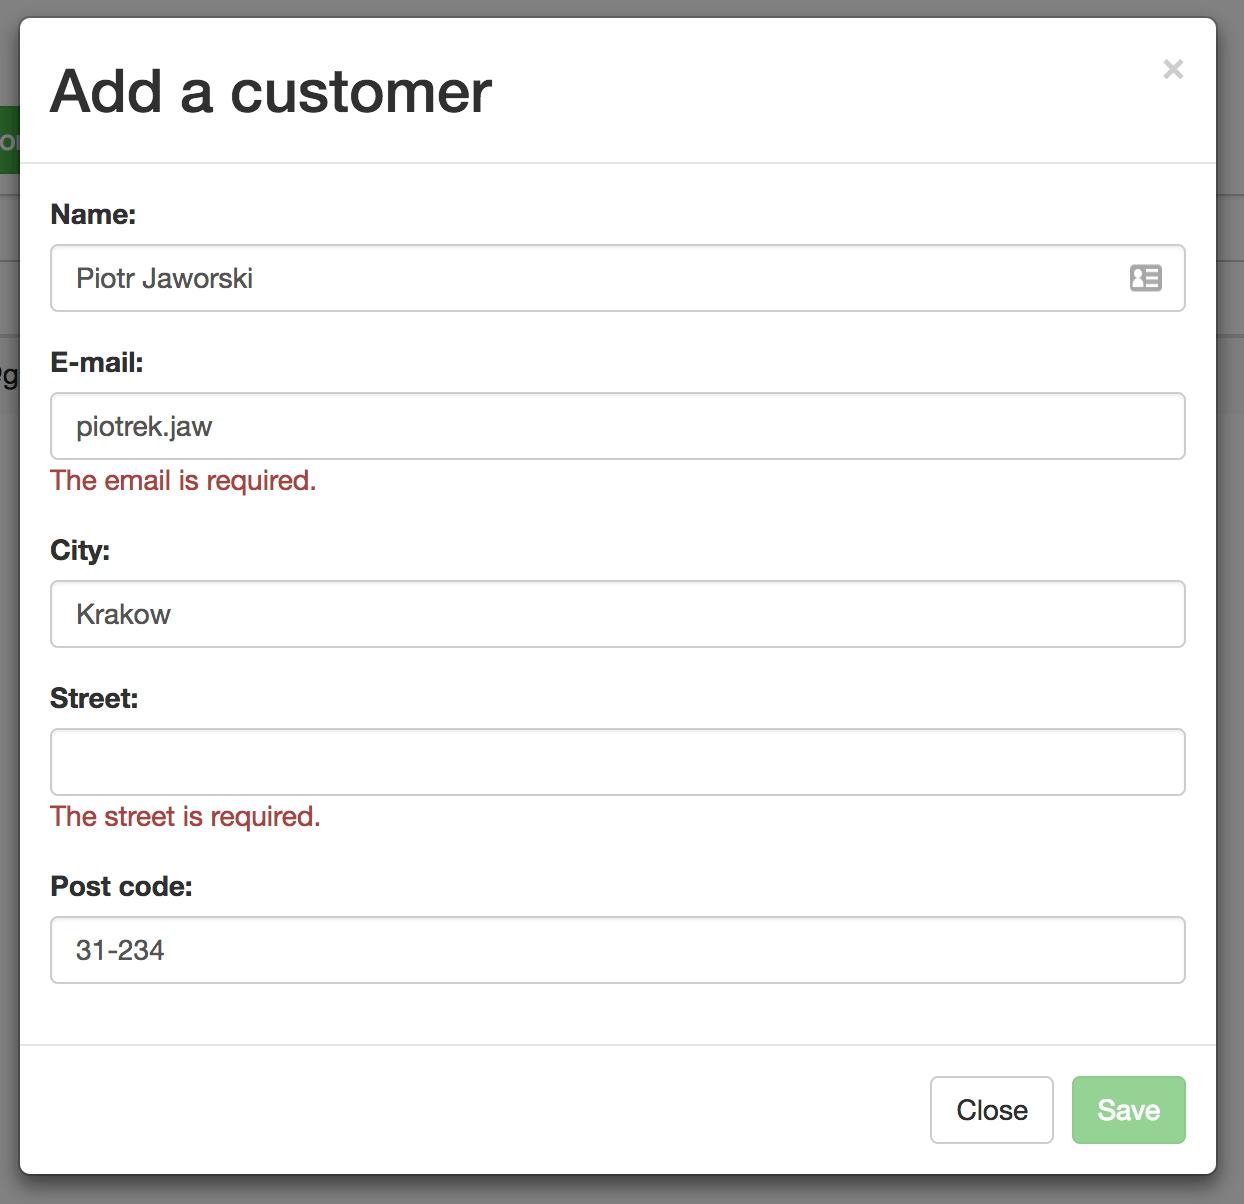
Your customer’s page should look like:

Repairs
Customers are ready, so not let’s add repairs. Create a scaffold:
$ rails g scaffold repair customer:references status:integer price:float name description:text
And run a migration to create a table:
$ rake db:migrate
Remember to remove app/assets/stylesheets/scaffolds.css – it could override some bootstrap’s styles.
We’ll need a new angular route – add new state to app.js:
.state('/repair', {
url: '/customers/:customerId/repairs/:repairId',
templateUrl: 'angular/templates/repairs/show.html',
controller: 'RepairController'
});
Also update Rails’ routes:
Rails.application.routes.draw do
  resources :customers, only: [:index, :create, :update, :show, :destroy] do
    collection do
      get :search
    end

    resources :repairs, only: [:create, :update, :show, :destroy] do
      collection do
        get :search
      end
    end
  end
  root 'main#index'
end
We need to clean the default generated controller by a generator again – update RepairsController.rb:
class RepairsController < ApplicationController
  before_action :set_customer, only: [:create]
  before_action :set_repair, only: [:show, :edit, :update, :destroy]

  def show
  end

  def search
    @repairs = Repair.search(params[:query], params[:customer_id])
  end

  def create
    @repair = @customer.repairs.new(repair_params)

    respond_to do |format|
      if @repair.save
        format.json { render :show, status: :created }
      else
        format.json { render json: @repair.errors, status: :unprocessable_entity }
      end
    end
  end

  def update
    respond_to do |format|
      if @repair.update(repair_params)
        format.json { render :show, status: :ok }
      else
        format.json { render json: @repair.errors, status: :unprocessable_entity }
      end
    end
  end

  def destroy
    @repair.destroy
    respond_to do |format|
      format.json { head :no_content }
    end
  end

  private

  def set_repair
    @repair = Repair.find(params[:id])
  end

  def set_customer
    @customer = Customer.find(params[:customer_id])
  end

  def repair_params
    params.require(:repair).permit(:customer_id, :status, :price, :name, :description)
  end
end
As you can see, I also added the search method, which will filter records in the same as in the CustomersController.
Update customer.rb to add the new association:
class Customer < ApplicationRecord
  has_many :repairs, dependent: :destroy
  …
end
We need to declare some methods inside the Repair class. The search method and some hacks will return records filtered by state – we will keep an integer in the database. We also need a JSON with all available states. Update the repair.rb file:
class Repair < ApplicationRecord
  belongs_to :customer

  validates :name, :description, :status, :price, :customer, presence: true

  enum status: %i(new_item in_progress done)

  def self.search(query, customer_id)
    q = "%#{query}%"
    status = status_number(query)

    where(customer_id: customer_id).
    where('description LIKE :query OR
           name LIKE :query OR
           price LIKE :query OR
           status = :status',
           query: q, status: status)
  end

  def self.status_number(name)
    q = name.parameterize('_')
    statuses[q] if statuses.keys.include?(q)
  end

  def self.statuses_json
    statuses.map do |k, v|
      {
        id: v,
        name: k
      }
    end
  end
end
Add app/views/repairs/search.json.jbuilder – same as with customers:
json.array! @repairs, partial: 'repairs/repair', as: :repair
Update app/views/repairs/_repair.json.jbuilder – we need customer, not customer_id:
json.extract! repair, :id, :customer, :status, :price, :name, :description, :created_at, :updated_at
Update app/views/customers/show.json.jbuilder:
json.set! :customer do
  json.partial! "customers/customer", customer: @customer
end

json.set! :repairs do
  json.array! @customer.repairs, partial: 'repairs/repair', as: :repair
end

json.set! :repair_statuses do
  json.array! Repair.statuses_json
end
Now we need customers, repairs and available repair’s statuses on the front-end.
You can remove all html.erb views inside the app/views/repairs – we won’t use them.
Add Repair.js service inside the angular/services folder – it’s very similar to Customer service – we define here all the needed methods to interact with the back-end:
var app = angular.module('app');

app.service('Repair', ['$http', function($http) {
  this.show = function(customerId, repairId) {
    return $http.get('/customers/' + customerId + '/repairs/' + repairId + '.json');
  };

  this.create = function(customerId, repair) {
    return $http.post('/customers/' + customerId + '/repairs.json', {
      repair: repair
    });
  };

  this.update = function(customerId, repair) {
    return $http.put('/customers/' + customerId + '/repairs/' + repair.id + '.json', {
      repair: repair
    });
  };

  this.destroy = function(customerId, repairId) {
    return $http.delete('/customers/' + customerId + '/repairs/' + repairId + '.json');
  };

  this.search = function(customerId, query) {
    return $http.get('/customers/' + customerId + '/repairs/search.json', {
      params: {
        query: query
      }
    });
  };
}]);
Add RepairController.js – it fetches the requested repair from the database.
var app = angular.module('app');

app.controller('RepairController', ['$scope', '$stateParams', '$http', 'Repair', function($scope, $stateParams, $http, Repair) {
  $scope.repair = {};

  function fetchRepair() {
    return Repair.show($stateParams.customerId, $stateParams.repairId).then(function(response) {
      $scope.repair = response.data;
    })
  };

  fetchRepair();
}]);
We changed the structure of the customers/show.json.jbuilder file. So now some updates inside the CustomersController.js are needed. Update app/assets/javascripts/angular/controllers/CustomersController.js and edit lines 22 and 38:
22: $scope.customers.push(response.data.customer);
38: $scope.customers[$scope.customerId] = response.data.customer;
We also want to use create/delete/edit/show and filter method with repairs.
Update app/assets/javascripts/angular/controllers/CustomerController.js:
var app = angular.module('app');

app.controller('CustomerController', ['$scope', '$stateParams', '$http', '$modal', 'Customer', 'Repair',
  function($scope, $stateParams, $http, $modal, Customer, Repair) {
  $scope.customer = {};
  $scope.repairs = [];
  $scope.repair = {};
  $scope.new_repair = {};
  $scope.repair_statuses = {};
  $scope.repairId = null;
  $scope.query = null;

  $scope.addRepair = function() {
    createModal.$promise.then(createModal.show);
  };

  $scope.createRepair = function() {
    Repair.create($scope.customer.id, $scope.new_repair).then(function(response) {
      $scope.repairs.push(response.data);
      $scope.new_repair = {};
      createModal.hide();
    }, function(response) {
      alert('Something went wrong: ' + response.statusText + '. Code: ' + response.status);
    });
  };

  $scope.editRepair = function(repair, index) {
    editModal.$promise.then(editModal.show);
    $scope.repair = angular.copy(repair);
    $scope.repairId = index;
  };

  $scope.updateRepair = function() {
    Repair.update($scope.customer.id, $scope.repair).then(function(response) {
      $scope.repairs[$scope.repairId] = response.data;
      $scope.repair = {};
      $scope.repairId = null;
      editModal.hide();
    }, function(response) {
      alert('Something went wrong: ' + response.statusText + '. Code: ' + response.status);
    });
  };

  $scope.destroyRepair = function(customerId, repairId, index) {
    Repair.destroy(customerId, repairId).then(function(response) {
      $scope.repairs.splice(index, 1);
    }, function(response) {
      alert('Something went wrong: ' + response.statusText + '. Code: ' + response.status);
    });
  };

  $scope.filterRepairs = function(query) {
    if($scope.query != '') {
      Repair.search($scope.customer.id, $scope.query).then(function(response) {
        $scope.repairs = response.data;
      });
    } else {
      fetchCustomer();
    }
  };

  function fetchCustomer() {
    return Customer.show($stateParams.customerId).then(function(response) {
      $scope.customer = response.data.customer;
      $scope.repairs = response.data.repairs;
      $scope.repair_statuses = response.data.repair_statuses;
    })
  };

  var createModal = $modal({
    scope: $scope,
    templateUrl: 'angular/templates/repairs/addRepairModal.html',
    show: false
  });

  var editModal = $modal({
    scope: $scope,
    templateUrl: 'angular/templates/repairs/editRepairModal.html',
    show: false
  });

  fetchCustomer();
}]);
As with the CustomersControllers a lot of things have changed. But these changes are really similar to those in the CustomersControllers. We define two modals and methods responsible for:
– Creating
– Updating
– Deleting
– Filtering
Then when we’re done with controllers, let’s add/edit some views.
Update app/assets/javascripts/angular/templates/customers/show.html. We need to add an input that is responsible for filtering repairs and buttons for deleting/updating/showing and adding a repair.
<div class="row">
  <div class="col-md-12">
    <h1>
      Customer # {{ customer.id}}
      <a class="btn btn-default" ui-sref="/customers">Back</a>
    </h1>

    <dl class="dl-horizontal">
      <dt>Name:</dt>
      <dd>{{ customer.name }}</dd>
      <dt>Email:</dt>
      <dd>{{ customer.email }}</dd>
      <dt>Street:</dt>
      <dd>{{ customer.street }}</dd>
      <dt>City:</dt>
      <dd>{{ customer.city }}</dd>
      <dt>Post code:</dt>
      <dd>{{ customer.post_code }}</dd>
    </dl>

    <h2>
      Repairs
      <a ng-click="addRepair()" class="btn btn-success">Add repair</a>
    </h2>

    <input ng-change="filterRepairs()" ng-model="query" class="form-control" placeholder="Search">

    <div ng-show="repairs.length">
      <table class="table table-striped">
        <thead>
          <tr>
            <th>Name</th>
            <th>Status</th>
            <th>Price</th>
            <th>Description</th>
            <th></th>
          </tr>
        </thead>

        <tbody>
          <tr ng-repeat="repair in repairs">
            <td>{{ repair.name }}</td>
            <td>{{ repair.status | humanize }}</td>
            <td>{{ repair.price | currency }}</td>
            <td>{{ repair.description }}</td>
            <td>
              <a class="btn btn-primary btn-xs" ui-sref="/repair({ customerId: customer.id, repairId: repair.id })">Show</a>
              <a class="btn btn-warning btn-xs" ng-click="editRepair(repair, $index)">Edit</a>
              <a class="btn btn-danger btn-xs" ng-click="destroyRepair(customer.id, repair.id, $index)">Destroy</a>
            </td>
          </tr>
        </tbody>
      </table>
    </div>

    <div ng-hide="repairs.length">
       <div class="alert alert-warning">
        <strong>Warning!</strong> There isn't any repair yet!
      </div>
    </div>
  </div>
</div>
We declared two modals so we also need to add two templates for them. They look almost the same as customer’s modals.
Add app/assets/javascripts/angular/templates/repairs/addRepairModal.html:
<div class="modal" tabindex="-1" role="dialog" aria-hidden="true">
<div class="modal-dialog">
<div class="modal-content">
<form novalidate name="newRepair" ng-submit="createRepair()">
<div class="modal-header">
<button type="button" class="close" aria-label="Close" ng-click="$hide()"><span aria-hidden="true">×</span></button>
<h2 class="modal-title">Add a repair</h2>
</div>
<div class="modal-body">
<div class="form-group">
<label>Name:</label>
<input class="form-control" name="name" type="text" ng-model="new_repair.name" required/>
<span class="text-danger" ng-show="newRepair.name.$touched && newRepair.name.$invalid">The name is required.</span>
</div>
<div class="form-group">
<label>Description:</label>
<textarea class="form-control" name="description" ng-model="new_repair.description" required/></textarea>
<span class="text-danger" ng-show="newRepair.description.$touched && newRepair.description.$invalid">The description is required.</span>
</div>
<div class="form-group">
<label>Price:</label>
<input class="form-control" name="price" type="number" ng-model="new_repair.price" required/>
<span class="text-danger" ng-show="newRepair.price.$touched && newRepair.price.$invalid">The price is required.</span>
</div>
<div class="form-group">
<label>Status:</label>
<select class="form-control" ng-model="new_repair.status" required>
<option ng-repeat="status in repair_statuses" value="{{status.name}}" required>{{ status.name }}</option>
</select>
<span class="text-danger" ng-show="newRepair.status.$touched && newRepair.status.$invalid">The status is required.</span>
</div>
</div>
<div class="modal-footer">
<button type="button" class="btn btn-default" ng-click="$hide()">Close</button>
<input ng-disabled="newRepair.$invalid" class="btn btn-success" type="submit" value="Save"/>
</div>
</form>
</div>
</div>
</div>Add app/assets/javascripts/angular/templates/repairs/editRepairModal.html:
<div class="modal" tabindex="-1" role="dialog" aria-hidden="true">
<div class="modal-dialog">
<div class="modal-content">
<form novalidate name="editRepair" ng-submit="updateRepair()">
<div class="modal-header">
<button type="button" class="close" aria-label="Close" ng-click="$hide()"><span aria-hidden="true">×</span></button>
<h2 class="modal-title">Edit a repair</h2>
</div>
<div class="modal-body">
<div class="form-group">
<label>Name:</label>
<input class="form-control" name="name" type="text" ng-model="repair.name" required/>
<span class="text-danger" ng-show="editRepair.name.$touched && editRepair.name.$invalid">The name is required.</span>
</div>
<div class="form-group">
<label>Description:</label>
<textarea class="form-control" name="description" ng-model="repair.description" required/></textarea>
<span class="text-danger" ng-show="editRepair.description.$touched && editRepair.description.$invalid">The description is required.</span>
</div>
<div class="form-group">
<label>Price:</label>
<input class="form-control" name="price" type="number" ng-model="repair.price" required/>
<span class="text-danger" ng-show="editRepair.price.$touched && editRepair.price.$invalid">The price is required.</span>
</div>
<div class="form-group">
<label>Status:</label>
<select class="form-control" ng-model="repair.status" required>
<option ng-repeat="status in repair_statuses" value="{{status.name}}" required>{{ status.name }}</option>
</select>
<span class="text-danger" ng-show="editRepair.status.$touched && editRepair.status.$invalid">The status is required.</span>
</div>
</div>
<div class="modal-footer">
<button type="button" class="btn btn-default" ng-click="$hide()">Close</button>
<input ng-disabled="editRepair.$invalid" class="btn btn-success" type="submit" value="Save"/>
</div>
</form>
</div>
</div>
</div>The last html file is the file responsible for rendering repair information.
Add app/assets/javascripts/angular/templates/repairs/show.html:
<div class="row">
  <div class="col-md-12">
    <h1>
      Repair # {{ repair.id}}

      <a class="btn btn-default" ui-sref="/customer({ customerId: repair.customer.id })">Back</a>
    </h1>

    <dl class="dl-horizontal">
      <dt>Name:</dt>
      <dd>{{ repair.name }}</dd>
      <dt>Description:</dt>
      <dd>{{ repair.description }}</dd>
      <dt>Price:</dt>
      <dd>{{ repair.price | currency }}</dd>
      <dt>Status:</dt>
      <dd>{{ repair.status | humanize }}</dd>
      <dt>Customer:</dt>
      <dd>{{ repair.customer.name }}</dd>
    </dl>
  </div>
</div>
There is one problem with repair’s statuses; they don’t look very pretty. In in_progress, new_repair, let’s add an angular filter which formats them to be “humanized” text:
Add app/assets/javascripts/angular/filters/humanize.js:
angular.module('app').filter('humanize', function() {
  return function(text) {
    var string = text.split('_').join(' ').toLowerCase();
    return string.charAt(0).toUpperCase() + string.slice(1);
  };
});
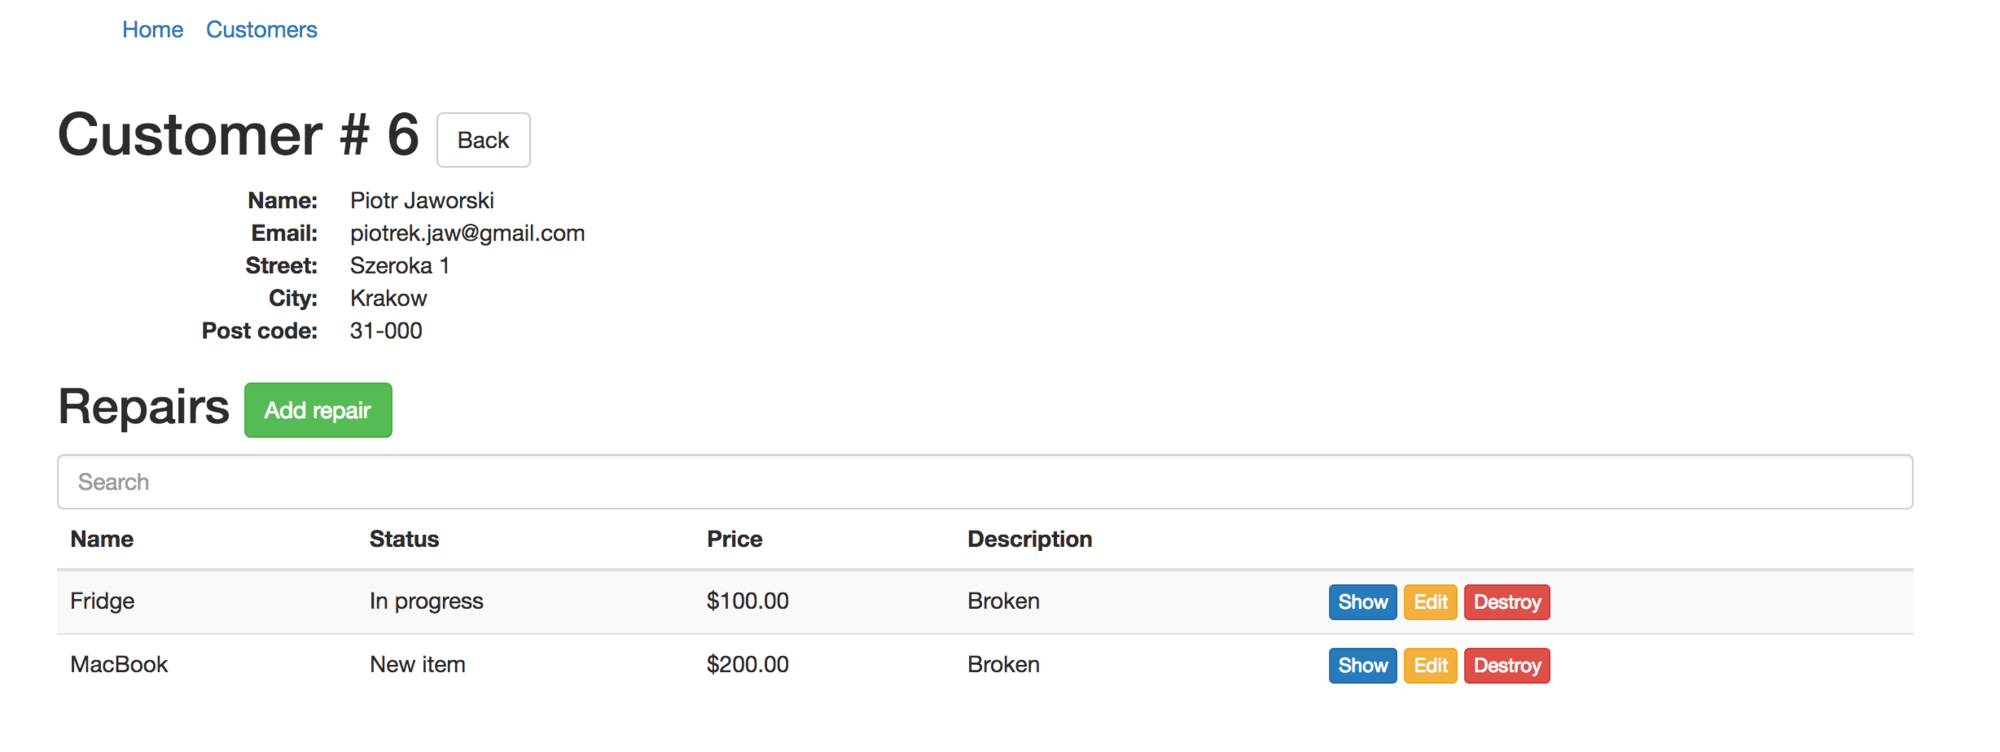
A single customer page includes repairs and looks like:
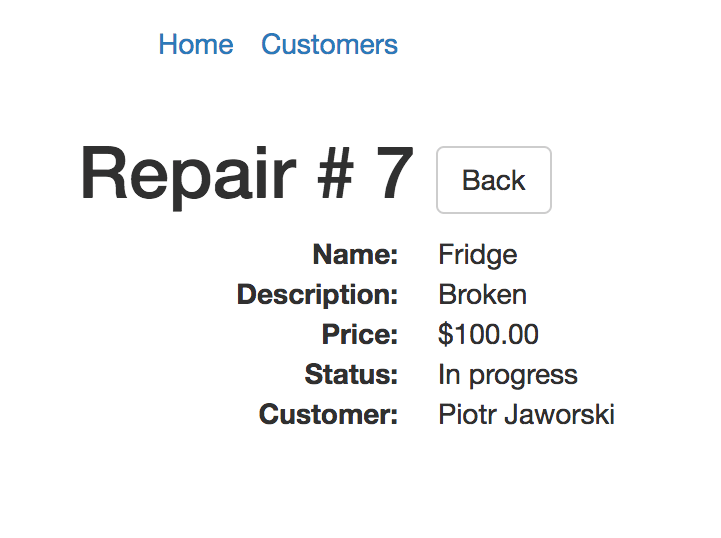
A repair page should look like:
In only a few steps we added a fully working AngularJS single page app using Ruby on Rails. With the UI-Router and Angular-templates, it’s really easy. I hope that you liked this tutorial and that it will be useful for you!
Here you can find the source code.
Subscribe to our newsletter for to find out about more great articles and tutorials. If you have any questions or suggestions, feel free to comment below.


